Package and individual tasks are validated during design phase itself,to delay the validations till execution phase ,there is an option under Properties - > DelayValidation
We can set DelayValidation property to True/False at package/individual tasks level
By default , DelayValidation property will be set to False
Example for DelayValidation property:
In this example,
1.)we are going to create a Table(named “Test_DelayValidation”) and insert some records using Execute SQL Task
2.)In the Data Flow Task, data from Table - “Test_DelayValidation” is moved to flatfile using OLE DB Source & FlatFile Destination
Step 1: Drag & drop Execute SQL Task into Control Flow tab as shown in below image.

Step 2:Double-click Execute SQL Task and set Connection & SQLStatement as shown in below image.

Step 3:Drag & drop Data Flow Task into Control Flow tab as shown in below image.

Step 4: In the Data Flow tab ,drag & drop OLE DB Source & FlatFile Destination as shown in below image.

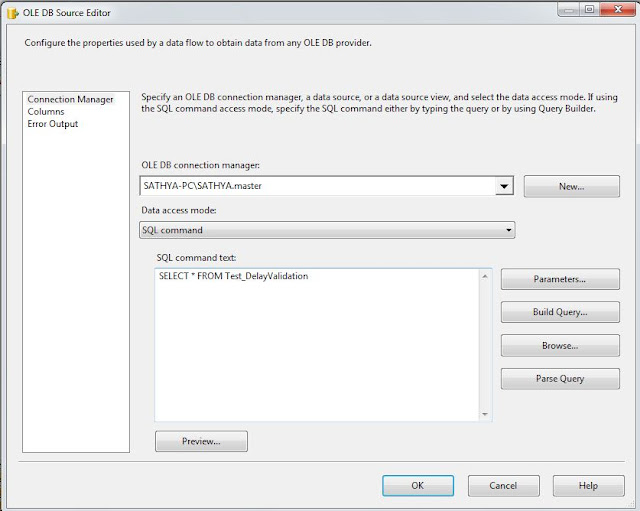
Step 5: Double-click OLE DB Source ,set OLE DB connection manager: and try as shown in below image.

Step 6:If you click OK ,you will get error as shown in below image.

Because Table - “Test_DelayValidation” does not exist in the database.
For the purpose of understanding DelayValidation property,create the table in the database which you have mentioned in the OLE DB connection manager
CREATE TABLE Test_DelayValidation (
col1 INT,
col2 VARCHAR(20))
GO
Step 7:Again double-click OLE DB Source , try as shown in below image and then click OK.
Step 8 : Drop the table and execute the package,you will get error as shown in below image
DROP TABLE Test_DelayValidation

Step 9: Now click on Data Flow Task and goto Properties or press F4
and set
DelayValidation property = True as shown in below image

Step 10 : Now again try to execute the package,
note Table - “Test_DelayValidation” was dropped at Step 8.
But now package will run successfully,by setting DelayValidation property = True

